Table of Contents
ToggleHydrangeas have quietly become the go-to shrub for homeowners serious about curb appeal. Unlike generic foundation plantings that blend into every neighborhood, hydrangeas make a statement, they’re bold, generous with blooms, and available in colors that actually complement your home’s exterior. Whether you’re looking to refresh a tired front entrance or start a hydrangea landscaping project from scratch, these flowering powerhouses deliver results that catch your neighbors’ attention and impress potential buyers. In this guide, you’ll learn how to select the right varieties, design a cohesive layout, and maintain thriving plants that look stunning from spring through fall.
Key Takeaways
- Hydrangea landscaping delivers reliable, abundant blooms for months in colors ranging from blue and purple to pink, white, and red—making them ideal for enhancing curb appeal.
- Choose panicle hydrangeas for cold climates and forgiving care, or mophead varieties for maximum color and impact if your zone supports them (5–9).
- Strategic placement with hydrangeas flanking your front door or massed along the foundation creates visual impact and draws attention to your home’s entrance.
- Plant hydrangeas 3–4 feet from the foundation in slightly acidic soil (pH 5.5–6.5) with consistent moisture, then maintain minimal pruning—just once yearly for panicles and light shaping for mopheads.
- Coordinate hydrangea colors with your home’s trim, shutters, and exterior tone to create architectural cohesion that appeals to both visitors and potential buyers.
Why Hydrangeas Are the Ultimate Curb Appeal Solution
Hydrangeas stand out because they deliver what other shrubs promise but rarely achieve: consistent, abundant bloom for months. A mature hydrangea can produce hundreds of flowers on a single plant, creating visual impact that foundation plantings simply can’t match. They’re not fussy annuals that demand replanting every season, and they’re not pruning-intensive like some ornamentals, they’re reliable perennials that improve with age.
They also offer genuine color variety. From deep blues and purples to whites, pinks, and even reds, hydrangea hues let you coordinate with your home’s trim, shutters, or stone. For front yard hydrangea landscaping specifically, this color range means you can tie your plantings into your home’s architectural palette instead of working against it. A white hydrangea beside a cream-colored cottage door creates cohesion: a blue variety against a gray or taupe exterior delivers contrast that pops from the street.
Maintenance-wise, hydrangeas ask for less than roses or ornamental grasses. They tolerate partial shade (a real bonus in established neighborhoods with tree cover), handle poor soils better than you’d expect, and need pruning just once yearly. Deer typically avoid them, making them practical in suburban landscapes where wildlife pressure is real.
Choosing the Right Hydrangea Varieties for Your Landscape
Not all hydrangeas are created equal, and planting the wrong type wastes years of growth. Your choice depends on your climate zone, available light, and the aesthetic you’re after.
Panicle, Mophead, and Lacecap Varieties Explained
Panicle hydrangeas (Hydrangea paniculata) are the workhorses of the genus. They produce cone-shaped flower clusters (panicles) that bloom from mid-summer into fall, shifting from white to pink as they age. Varieties like ‘Grandiflora’ and ‘Limelight’ reach 6–8 feet tall and tolerate zone 3 through 8, making them reliable even in colder climates. They’re also the most forgiving of poor soils and shade. If you’re in an iffy microclimate or just want something that won’t demand babying, start here.
Mophead hydrangeas (Hydrangea macrophylla) produce those classic, full flower domes you see on classic Victorian porches. They’re the stars of Instagram and garden magazines because they bloom heavily and come in nearly every color imaginable. The catch: they’re zone 5–9 plants and don’t tolerate zone 3–4 winters reliably. Mopheads also require pruning at precisely the right time (late summer to early fall) because they set next year’s buds before winter. Plant too late in summer, and you’ll lose your flower buds to frost.
Lacecap hydrangeas are mopheads’ elegant cousins, flat clusters of tiny fertile flowers surrounded by larger sterile blooms. They’re less showy than mopheads but offer a sophisticated, delicate look that suits modern landscapes. They share the same hardiness and pruning quirks as mopheads, so they’re best for zones 5 and warmer.
For front yard hydrangea landscaping, start by checking your hardiness zone and asking yourself: do you want reliable blooms every year (panicle), or are you willing to manage timing for maximum color (mophead)? Both succeed, but the commitment differs.
Designing a Stunning Front Yard Layout With Hydrangeas
Placement Strategies and Color Coordination
Hydrangeas work best when they’re part of a layered planting scheme, not isolated specimens dotting the lawn. Start by sketching your front yard on graph paper, marking your home’s entry, major walls, window lines, and any existing trees or structures. Hydrangeas typically reach 4–8 feet tall and 4–6 feet wide at maturity (depending on variety), so position them where they frame your entrance without blocking windows or creating a wall that cuts off your porch from the street.
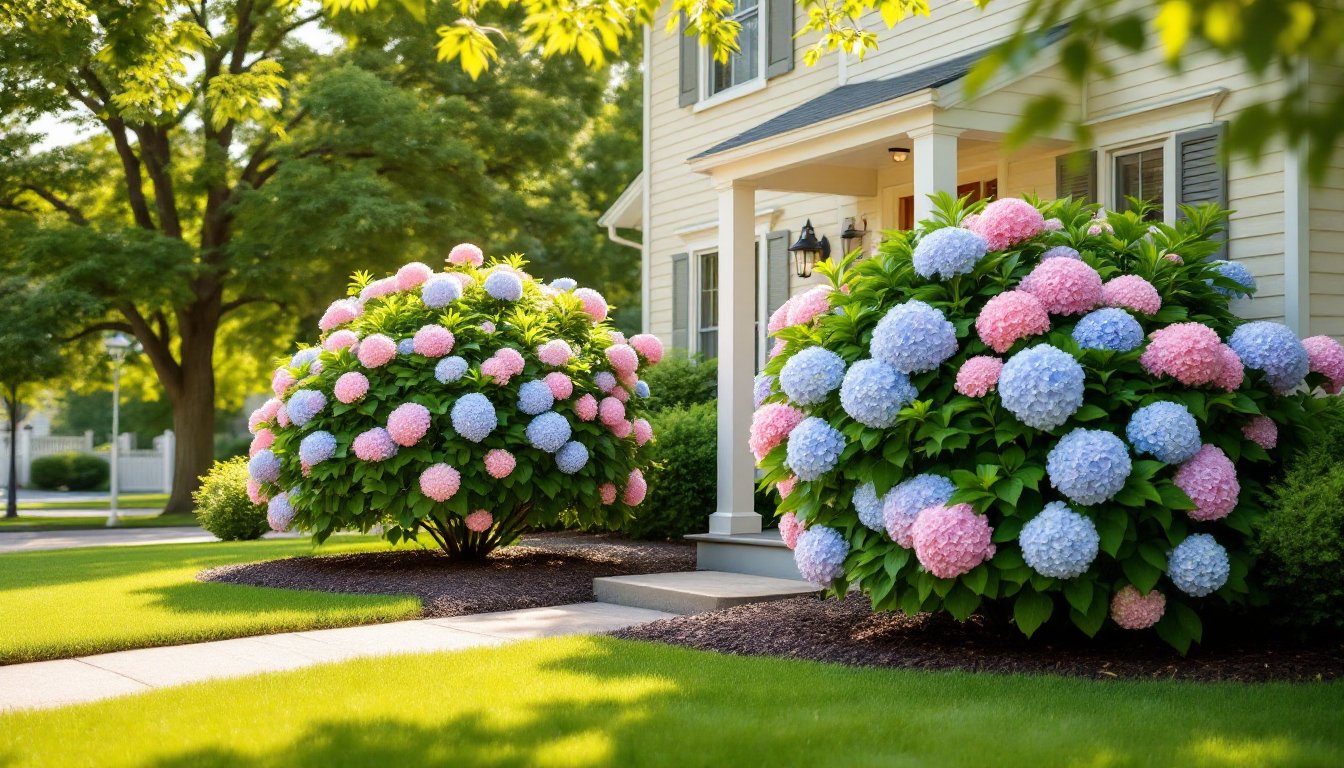
One proven layout: place a pair of hydrangeas flanking your front door, spaced 3–4 feet from the entrance and about 6 feet apart. This creates symmetry and draws the eye toward entry. If your front is wider, a trio, one central cluster with flanking plants, works beautifully. For ranch or bungalow-style homes, a massed planting along the foundation (3–5 shrubs) makes a bold statement.
Color coordination matters more than you’d think. Your hydrangea color should echo your home’s trim, shutters, or stone. A white house with blue shutters sings with blue hydrangeas: a gray exterior and white trim pair perfectly with white or pale pink varieties. If your home is a warm tone (tan, cream, honey-colored siding), pink and warm-toned mopheads are your friend. Cold-toned homes (pale blue, gray, white) look sharp with deep blues and purples, or conversely, with crisp whites for maximum contrast.
Consider sightlines too. You want your hydrangeas visible and appreciated from the street, which means planting them far enough forward that they’re not hidden behind existing shrubs or trees. Most front yards benefit from hydrangeas positioned 3–4 feet out from the foundation line, which creates visual breathing room and prevents that “everything hugging the house” look. Modern front yard landscaping often uses hardscaping and lawn-free designs to frame plantings, so consider a mulch bed, stone surround, or low edging to define your hydrangea zone and set it apart from the rest of the lawn.
Planting and Care Tips for Long-Term Success
Hydrangeas are forgiving, but planting them correctly saves years of struggling. Start with a quality potted specimen from a local nursery, they’ve already acclimated to your region, rather than bare-root mail-order plants. Pot sizes typically range from 1 gallon (young, spindly) to 3–5 gallons (mature, ready-to-bloom).
Dig a hole 1.5 times wider than the root ball and just as deep, no deeper. Backfill with a 50/50 mix of native soil and aged compost or peat moss. Hydrangeas tolerate a range of soils, but they prefer slightly acidic (pH 5.5–6.5) and consistent moisture. If your soil is very alkaline (pH 7.5+), you’ll struggle with blue colors: amend with sulfur if blue is your goal, or simply plant pink and red varieties that aren’t pH-dependent.
Water deeply after planting and keep the soil consistently moist (not soggy) for the first growing season. A 2–3 inch mulch layer of shredded bark or wood chips retains moisture and moderates soil temperature. Avoid mulch piled against the stem, keep a 1-inch gap to prevent rot.
Fertilizing isn’t essential if you’ve amended your planting hole with compost, but a balanced, slow-release fertilizer applied in early spring supports vigorous growth. Avoid high-nitrogen formulas, which push foliage at the expense of blooms. Once established (after year 2), most hydrangeas thrive on rainfall alone in regions receiving 50+ inches annually: elsewhere, water during dry spells, aim for 1 inch per week from rain or irrigation.
Seasonal Maintenance to Keep Your Hydrangeas Thriving
Hydrangeas ask for minimal intervention, but timing matters. Spring (late March to April in most zones) is pruning time. For panicle hydrangeas, cut stems back by one-third their height to shape the plant and encourage bushier growth. For mopheads and lacecaps, prune only to remove dead wood and shape lightly, these varieties set their flower buds in late summer, so aggressive spring pruning removes next year’s blooms.
Summer is bloom season. Deadheading (removing spent flowers) encourages some repeated blooming on panicles, though it’s optional. Mopheads and lacecaps flower continuously whether deadheaded or not. Water during hot spells: hydrangeas are thirsty plants and wilt dramatically if neglected, though they bounce back once watered.
Fall brings color changes, pink mopheads often shift to deeper purplish-reds, whites develop rusty tones, and the onset of bud-setting. Avoid pruning mopheads and lacecaps after August 15 in zones 5 and colder, as you’ll cut off next year’s flowers. Leave panicle flowers on the plant into winter: their dried forms look attractive through the season.
Winter is minimal-care time. In harsh climates (zone 4 and colder), mopheads and lacecaps sometimes die back, though they often resprout from the roots. Protect plants in extremely cold microclimates by mounding mulch around the base in late fall, then removing it in spring. The Spruce and similar horticultural resources offer detailed zone-specific guides if you’re navigating edge-case climates.
Watch for pests: Japanese beetles occasionally feed on hydrangea foliage in midsummer, but damage is rarely severe. Spider mites appear in very hot, dry conditions: a steady misting from your hose usually deters them. Disease is rare if you water at soil level (not overhead) and avoid overcrowding plants, good air circulation prevents fungal issues. Every 3–4 years, thin out older canes at ground level to rejuvenate the plant’s structure and encourage new flowering wood.