Table of Contents
ToggleA sloped backyard isn’t a flaw, it’s an opportunity. Too many homeowners see a steep grade and imagine erosion problems or wasted space. In reality, a slope opens the door to tiered gardens, dramatic water features, and design solutions that flat yards can’t achieve. Whether your grade is slight or severe, terracing, retaining walls, and thoughtful drainage can turn that challenging slope into a functional, beautiful outdoor space. This guide walks you through practical landscaping strategies that work with your terrain, not against it.
Key Takeaways
- Terracing breaks a sloped backyard into functional, flat platforms held by retaining walls, preventing erosion while creating usable garden space.
- Proper soil compaction and drainage are critical to retaining wall stability; skipping compaction or drainage can lead to wall failure within a year.
- Native plants with fibrous root systems and dense spacing prevent erosion and reduce maintenance demands on sloped terrain.
- Standard step proportions (6–7 inches rise, 11–13 inches tread depth) ensure safe, natural-feeling foot traffic on steep slopes.
- Strategic surface and subsurface drainage—including swales and perforated drain lines—prevents concentrated water flow that destabilizes slopes and structures.
- Budget-friendly backyard slope landscaping ideas range from mulched hillside gardens ($100–200) to timber steps ($200–400), allowing DIY projects that build skills before tackling complex structures.
Terracing: The Ultimate Solution for Slope Stability and Visual Appeal
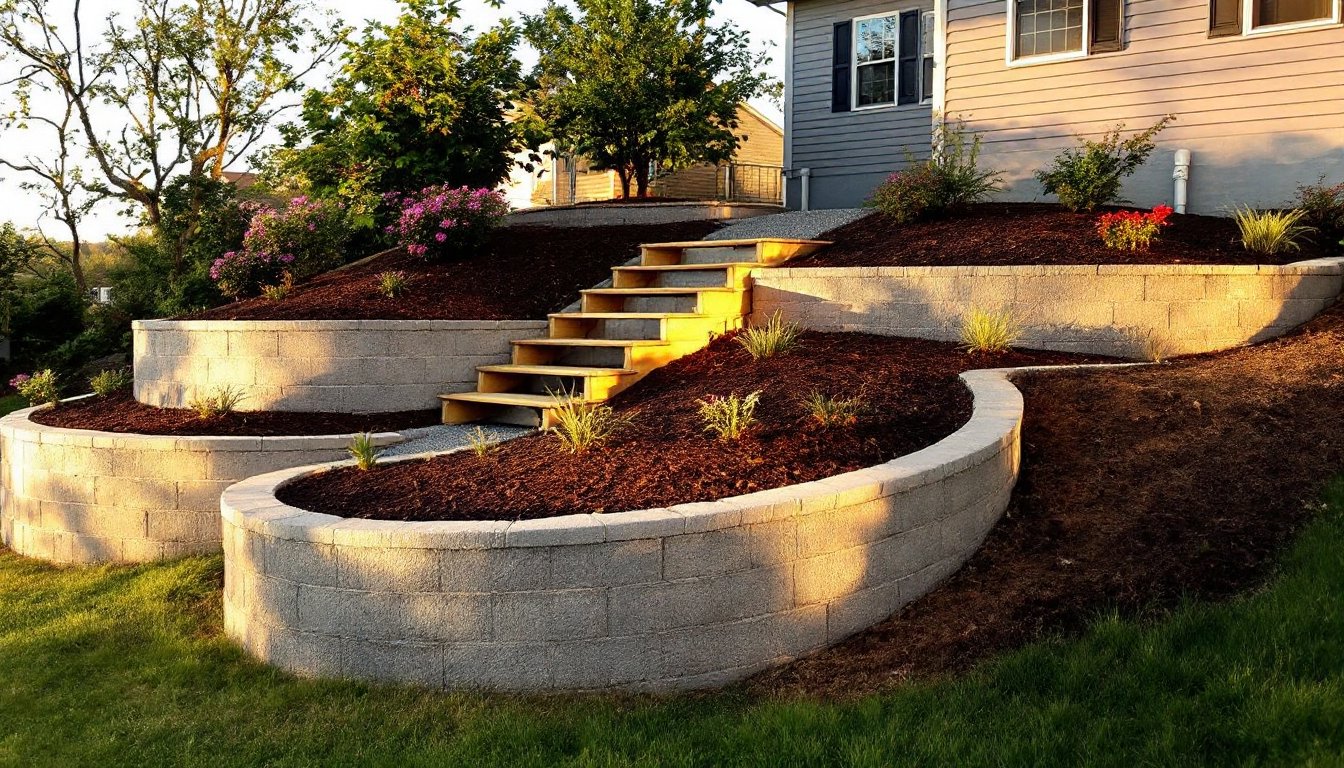
Terracing is the gold standard for sloped yards, it breaks your hill into flat, usable platforms held in place by retaining walls or berms. Think of it as sculpting your land into manageable steps.
A basic two-tier terrace works well for gradual slopes (under 15 percent grade). You’ll identify the natural contours of your property, then mark where each level will sit. The downhill side of each terrace gets a retaining wall: the uphill side becomes your garden bed or seating area. This design prevents erosion while creating valuable flat space.
For steeper slopes, three or more tiers distribute the grade more gently and look more proportionate. Each tier should be at least 3 to 4 feet wide to feel functional, narrower terraces waste space and create awkward maintenance. Standard railroad ties, stacked stone, or concrete blocks work as retaining materials: choose based on your aesthetic and budget. Wood rots over time in moist soil, so expect 10- to 15-year lifespans for ties unless treated.
Soil compaction is critical. When you cut and fill to create terraces, loose soil will settle and crack walls. Compact each 6-inch lift with a tamper or plate compactor as you build. If you’re moving significant earth, rent the equipment rather than hand-tamping, it’s worth the cost for stability. Many DIYers skip this step and watch their walls fail within a year. Permitting requirements vary by jurisdiction and wall height: most areas require permits for walls over 4 feet. Check with your local building department before breaking ground.
Retaining Walls: Adding Structure and Preventing Erosion
A retaining wall does exactly what its name suggests, it holds back soil on a slope, creating a flat terrace or bench below. Without it, rain and gravity gradually funnel soil downhill, destabilizing plants and structures.
Segmental concrete blocks (like Versa-Lok or similar interlocking systems) are the most accessible DIY option. They’re stackable, mortarless, and roughly 12 inches long and 6 inches tall, easy math for planning. For a 2-foot-tall wall, you’d stack four courses. These systems include a batter (slight backward lean) that’s engineered into each block, so gravity actually helps hold them in place. Standard practice calls for gravel backfill and landscape fabric to manage water pressure behind the wall and prevent clogging.
Soil-filled blocks work too, but they’re heavier to set and slower to build. Stacked stone looks premium but demands careful selection and patient dry-stacking: mortar adds complexity and cost. Natural stone also requires a reinforced gravel base and often benefits from professional installation if you want it to last.
Drainage behind the wall is non-negotiable. Water pressure (hydrostatic force) is the leading cause of wall failure. Install a perforated drain pipe at the base, wrapped in filter fabric, sloping away from your foundation. This pipe directs water to daylight or a swale rather than backing up behind the wall. Without it, a wall over 3 feet tall faces serious failure risk within a few years.
Walls over 4 feet typically require a building permit and sometimes engineer stamping, depending on local code. Setback requirements also vary, some jurisdictions require a 1-foot setback for every 4 feet of height. Always check before you build.
Native Plantings for Sloped Terrain
Once your wall is in, planting the terrace above prevents further erosion and locks the structure in place. Native shrubs and groundcovers are ideal, they’re adapted to local rainfall and soil, reducing watering demands and establishment time.
Choose plants with fibrous root systems that bind soil together. Native sedges, fescues, and shrubs like serviceberry, elderberry, and viburnum work across much of North America. For western slopes, native bunch grasses and drought-tolerant shrubs reduce maintenance. Eastern yards benefit from shade-loving natives like ferns, hostas, and native azaleas.
Plant density matters. Space shrubs closer than their mature width suggests to quickly establish a living mat that holds soil. On steep grades, a 3-by-3-foot mature shrub might go in 2 feet apart initially: it’ll fill out and create a unified canopy within 3 years. Slower filling means more erosion windows. Mulch generously (3 to 4 inches) after planting to suppress weeds and retain moisture, this is especially important the first two growing seasons.
Steps and Pathways: Creating Safe, Functional Access
Steps break up steep slopes into safe, walkable increments. A standard step rises 6 to 7 inches and runs 11 to 13 inches deep (the tread). These proportions feel natural and reduce tripping risk: stairs steeper than this are hazardous for repeated foot traffic.
For a slope, count the total vertical drop from top to bottom. Divide that by 7 inches to estimate the number of steps needed. A 4-foot drop requires roughly 7 steps. Once you have that number, you can calculate the total run (horizontal distance the staircase covers) and plan it into your layout.
Timber steps are the quickest DIY approach. Pressure-treated 2×12 boards, set into the slope and anchored with rebar or deadmen (horizontal beams driven into the hillside), create rustic, functional steps. Each step should sit on stable, compacted soil, don’t just rest it on loose earth. For treads, stack a second 2×12 to create a 12-inch depth. Add a gravel or pea-gravel surface for traction.
Stone steps feel more permanent and weather better. Thick flagstone (2 to 3 inches) or bluestone works, set on a compacted gravel base with crushed stone joints. Stone steps demand more precision, measure carefully and plan the layout before you start digging. Winding paths alongside steps soften the transition and give options for those with mobility concerns: garden path ideas can inspire natural, flowing layouts.
Always add edge containment, pressure-treated 2×6 boards edging the sides or stone borders, to prevent soil creep into the steps. And ensure proper drainage on either side: water flowing down steps accelerates erosion of the surrounding slope.
Drainage Considerations for Your Slope
Poor drainage is behind most landscaping failures on slopes. Water doesn’t percolate evenly: it follows the path of least resistance, often straight downhill, eroding channels and overwhelming retaining walls.
Surface drainage comes first. Grading the tops of terraces so water runs perpendicular to the slope (left or right) rather than straight downhill prevents concentrated flow. A gentle 1- to 2-percent slope (1 foot of rise for every 50 feet of run) sheds water without looking odd. Swales, shallow, vegetated ditches, channel water to a lower collection point or daylight drainage area.
Subsurface drainage handles water below the surface. That perforated drain line behind retaining walls is essential, but consider adding French drains (gravel-filled trenches with pipe) in areas where water pools or where surface clay soils slow percolation. These installations route water away from structures and out of your problem zones.
Mulch choices also affect drainage. Avoid thick, compacted mulch that sheds water: use loose, organic mulch that allows infiltration. Over time, organic mulch breaks down and improves soil structure, increasing permeability naturally.
For properties sloping toward the house, a perimeter drain or daylight channel at the base of the slope prevents basement moisture problems. This is code-required in many jurisdictions and saves thousands in water damage later. If your slope channels water toward your foundation, this isn’t optional, it’s a safety and structural issue.
Budget-Friendly DIY Slope Landscaping Projects
Not every slope project requires heavy machinery or a contractor. Start small and build over time.
Mulched hillside gardens cost almost nothing. Clear existing vegetation, add 4 inches of wood chip or shredded bark mulch, and plant native shrubs and groundcovers. A 200-square-foot slope might cost $100–200 in plants and mulch. This works for slopes under 20 percent grade where erosion hasn’t carved channels yet. Reseed or replant every 2–3 years as mulch breaks down.
Timber steps with gravel treads are budget-conscious. Pressure-treated 2×12s run $30–50 each: for a 7-step flight, budget $200–400 in lumber plus anchoring materials. A shovel and level are your only tools. This approach avoids equipment rental and gives results in a weekend.
Rock-lined terraces use the retaining boulders and driftwood approach, no mortar, just heavy stones placed to create a natural-looking berm. Source river rock or stone from local suppliers (often cheaper than buying bagged): a stone yard might sell off-spec or slightly damaged pieces at discount. Arrange larger stones as a base, backfill with soil, plant, and mulch. It’s slower and more artistic than systematic retaining walls, but it costs half as much.
Erosion control fabric and native plantings stabilize slopes without walls or steps. Lay coir mesh or jute netting over the slope, stake it down, cut holes, plant natives, and mulch. Fabric biodegrades after 2–3 years once plants are established. Cost is roughly $50–100 in fabric and $200–400 in plants for a modest slope, budget landscaping that prevents bigger problems.
landscape design ideas for creative approaches to maximizing outdoor space, including slope-specific designs. You can also explore pool landscaping options if you’re considering water features on your grade. For comprehensive guidance on slope solutions, resources like slope garden solutions showcase detailed techniques and real-world examples.
The key is matching your ambition to your timeline and budget. A DIY-friendly first project builds skills and tests what works on your specific site before investing in more complex structures.
Conclusion
A sloped backyard requires strategic thinking, but it rewards that effort with visual interest and functionality that flat yards struggle to achieve. Whether you terrace, add steps, or plant strategically, the same principle applies: work with the slope, not against it. Start with drainage, add structure where needed, and let native plants stabilize the soil. Your slope will transform from a challenge into one of your yard’s best features.