Table of Contents
ToggleA Whirlpool dishwasher’s float switch is one of those small but critical parts that most homeowners never think about, until something goes wrong. This sensor monitors water levels inside the tub and tells your dishwasher when to stop filling. When it fails, you’ll either have standing water pooling at the bottom or the machine refusing to fill properly. The good news? Replacing a Whirlpool dishwasher float switch is a manageable DIY project that can save you $300+ in service calls. This guide walks you through spotting the problem, locating the switch, and swapping it out yourself.
Key Takeaways
- A Whirlpool dishwasher float switch is a mechanical sensor that regulates water levels and prevents overfilling or underfilling, making it critical for proper operation and preventing costly leaks.
- Common signs of float switch failure include standing water in the tub, leaks under the door, dirty dishes after a full cycle, and error codes like E4 on newer models.
- Replacing a Whirlpool dishwasher float switch is a manageable DIY project that takes under an hour and can save $300+ in professional service calls if you have the right tools and part.
- Before replacement, visually inspect the float rod and buoyant float in the sump area to confirm they’re cracked, bent, or stuck, and verify your exact Whirlpool model number to order the correct part.
- During installation, hand-tighten mounting screws gently to avoid cracking the plastic tub, reconnect the wire harness securely, and run a test cycle to confirm smooth float movement and proper inlet valve shutdown.
- If water still pools after float switch replacement, the issue may lie elsewhere such as the inlet valve or control board, which would require professional diagnosis.
What Is a Float Switch and Why It Matters
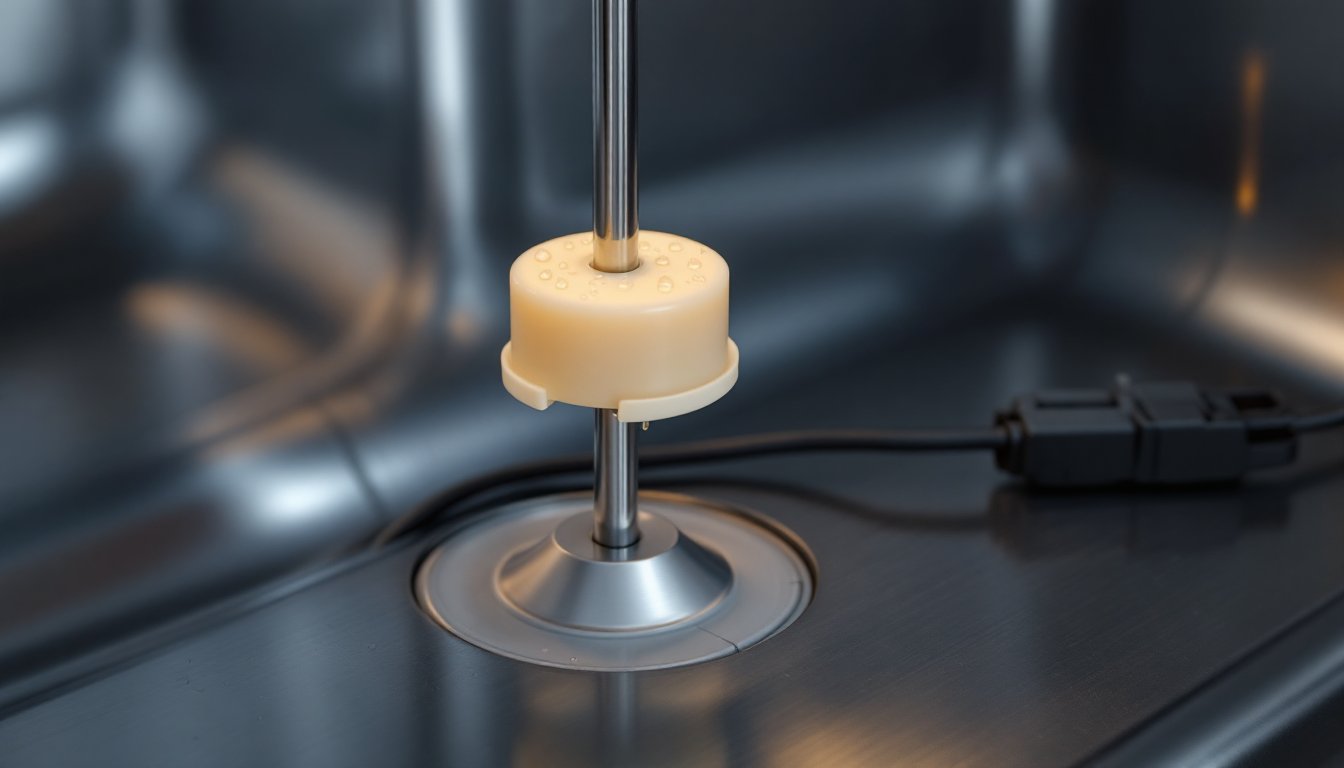
A float switch is a simple mechanical device that rises and falls with water level inside your dishwasher tub. Think of it like a fishing bobber on a wire or rod, as water rises, the float lifts, triggering an electrical contact that tells the inlet valve to shut off. When water drains, the float drops back down and resets. On Whirlpool models, this switch is typically mounted near the sump area (the lowest point inside the tub) and connects to the water inlet valve.
Why does this matter? Without a working float switch, your dishwasher can’t regulate water intake. Either it overfills and leaks onto your kitchen floor, or it underfills and your dishes come out dirty. The switch also prevents the pump and motor from running dry, which would cause damage. It’s one of those parts that does its job quietly until it stops working, then everything falls apart. Unlike complex circuit boards, the float switch is a mechanical component with no electronics, which is why replacing it is straightforward for a confident DIYer.
Signs Your Whirlpool Dishwasher Float Switch Is Failing
Water Drainage and Overflow Issues
The most obvious sign is pooling water. If you open your dishwasher mid-cycle and see standing water in the bottom that doesn’t drain before or after the wash cycle completes, your float switch may be stuck. Another tell-tale sign is water leaking from underneath the dishwasher door or onto your kitchen floor, this usually means the tub is overfilling because the switch never signals the inlet valve to close.
Conversely, if your dishes come out filthy even though running a full cycle, the float switch might be preventing the tub from filling to the proper level. The dishwasher will think it’s full when it isn’t, short-cycling the wash. You might also notice the spray arms aren’t rotating with enough pressure, a symptom of insufficient water.
Error Codes and Strange Noises
Newer Whirlpool models (2020 and onward) display error codes on the control panel when sensors malfunction. Look for codes like E4 (water level sensor fault) or similar float-related errors in your owner’s manual. Older models won’t show a code but may emit strange sounds: a continuous clicking or buzzing as the inlet valve opens and closes repeatedly, or an urgent beeping warning that the tub is either overfilled or underfilled.
Some Whirlpool dishwashers also have a diagnostic mode. Consult your manual or contact Whirlpool support to access it, which can confirm float switch failure before you tear into the machine.
How to Access and Inspect the Float Switch
Before you commit to replacement, you need to locate and visually inspect the float switch. Safety first: Unplug the dishwasher or flip its circuit breaker off. Drain any remaining water using the filter access or sump drain at the bottom of the tub.
On most Whirlpool models, the float switch sits in the sump area, a recessed pocket at the lowest point inside the tub. Start by removing the kick panel (the decorative trim at the bottom front) using a screwdriver or wrench to access the mounting bolts. Next, pull the dishwasher out slightly from the cabinet so you can reach the back connections. Locate the wire harness connecting the float switch to the control board: gently disconnect it by hand or using needle-nose pliers if the clip is tight.
Once disconnected, look inside the sump to spot the float rod and buoyant float itself. It should move freely up and down without resistance. If it’s cracked, stuck, or the rod is bent, replacement is your fix. Some older models have the switch mounted on the tub wall rather than the sump bottom, check your specific model’s manual for exact location. If it’s stuck in place, you can try gently working it loose by hand, but if it won’t budge without force, stop: you’ll likely damage the tub, and at that point, calling a technician makes sense.
Step-by-Step Replacement Guide
What You’ll Need:
- Replacement float switch kit (specific to your Whirlpool model number)
- Screwdriver (typically Phillips or flat-head, depending on your model)
- Socket wrench or hex key (for mounting bolts)
- Needle-nose pliers (for stubborn clips)
- Bucket or towels (to catch any remaining water)
- Work gloves and safety glasses
The Replacement Process:
-
Verify the old switch is truly the culprit. With the dishwasher unplugged, manually push the float up and down inside the sump several times. If you hear a faint clicking or feel resistance, the switch’s internal contact may be worn or dirty. A gentle clean with a dry cloth might temporarily fix it, but replacement is the permanent solution.
-
Order the correct part. Your Whirlpool model number (found on the back panel or inside the door edge) determines the exact float switch assembly. Don’t guess, a wrong part won’t fit and can’t be returned in many cases. Budget $40–$120 for the part itself.
-
Disconnect the old switch. With the power off and the dishwasher pulled out, unplug the wire harness. If it’s clipped on, press the clip tabs gently. Unscrew the mounting bolt or bolts holding the switch assembly to the tub (usually one or two Phillips-head screws). Some models have a twist-lock fitting: if so, turn counterclockwise to release.
-
Install the new switch. Position the new float assembly in the exact same spot as the old one. Align the mounting holes and hand-tighten the screws first, don’t over-torque, as you can crack the plastic tub. Tighten firmly but gently with your screwdriver. Reconnect the wire harness, making sure the clip snaps securely into place.
-
Test before sealing. Plug the dishwasher back in. Run a short diagnostic or test cycle (check your manual for how to access this). Watch the float move as water fills and drains. You should see smooth up-and-down motion with no grinding or resistance. Listen for the inlet valve to shut off once the tub reaches the proper level, this typically happens about halfway full.
-
Run a full cycle. After the test, run a complete wash cycle on a light or normal setting. Check underneath the dishwasher for leaks during the fill phase. No water pooling at the bottom when the cycle ends? Success. If water still pools, the new switch may be faulty (rare), or a different component (inlet valve, control board) is the real culprit.
Pro Tip: Take a photo of your model’s float switch location before you start. Some Whirlpool designs are tricky, and having a visual reference beats hunting through PDFs mid-project. Dishwashers that aren’t cleaning properly sometimes get blamed for float switch failure when the real issue lies elsewhere, so verify your diagnosis before buying parts. If you’re unsure or uncomfortable working inside the tub, Family Handyman has detailed video walkthroughs for many appliance repairs, and This Old House offers solid foundational repair techniques.
Conclusion
A failed float switch turns your Whirlpool dishwasher from helpful to useless, but it’s one of the easier repairs a homeowner can tackle. Once you’ve confirmed the symptom, standing water, leaks, or error codes, ordering the right part and installing it takes under an hour. The hardest part is often just reaching the switch inside the tub, not the replacement itself. When the new float moves smoothly and your cycle completes without pooling water, you’ll have saved yourself a service call and learned something useful about how your appliance actually works.